Goodbyes
Just like welcoming users to your group, you can also have Rose give them a goodbye to let your users know who has left the group.
Enabling Goodbyes
To get started with goodbyes, you'll need to enable them. To do this, you will need to issue either of the following commands
/goodbye on
Disabling Goodbyes
If you no longer want to have goodbyes, simply issue either of the following commands
/goodbye off
Customising Your Goodbye Text
Customising your goodbye text works the same as customising your welcome text. You can use the default text if you wish, but if you want to give your users a special farewell when they leave the group chat, keep reading!
Setting A Custom Goodbye
We can set a custom goodbye message by issuing the following command, where means the message you want Rose to say:
/setgoodbye <message>
Any text you enter after the command will become part of your goodbye message.
Goodbyes support message formatting via markdown - so if you'd like to make your messages look all fancy, have a look at the docs on formatting!
So, for example, if you wanted to have a message that says "User John Smith (ID 64536455) has left the chat", you
would
enter the command like below:
/setgoodbye User {fullname} (ID \`) has left the chat`
Using Stickers Or Media As A Goodbye
You can also use stickers or other attachments as part of your goodbye messages. In order to do this, you'll need to issue the /setgoodbye command as a reply to the sticker or other attachment (such as a sticker or photo). The usage is the exact same as the normal usage, simply issue the below command as a reply to the attachment:
/setgoodbye <message>
The "message" portion of the command in this case would add a caption to the image.
Example
Let's say someone posted an image of some kittens that you want to use as your goodbye message, and you wanted to also have a caption for the image that says "See ya! PS - Here's some kittens!", you'd simply reply to the image with the below command:
/setgoodbye See ya! PS - Here's some kittens!
If you wanted to set the goodbye to ONLY be the picture, then you'd simply reply to the image with the /setgoodbye command and no arguments, like shown below:
/setgoodbye
Note
Stickers cannot have captons added to them. Telegram only allows stickers to be sent by themselves, so you cannot add any sort of caption or message to a sticker-based goodbye.
Reset Goodbye Text
At any time, you can reset the goodbye text to the default string. After issuing the below command, Rose will bid farewell to users with this standard goodbye: "Nice knowing you!"
/resetgoodbye
Viewing Your Set Goodbye
Just like welcomes, you can view what the current goodbye in your group chat is set to. There are two ways you can view what your chat's currently configured goodbye is.
View Goodbye (Formatted)
This option is the standard way to view a goodbye. You can view the goodbye exactly as it's displayed to users. What this means is that if you have any buttons or markdown in your goodbye message, it will display it with those buttons or formats. You can do this but issuing the /goodbye command without any arguments:
/goodbye
The result will be a message like this:

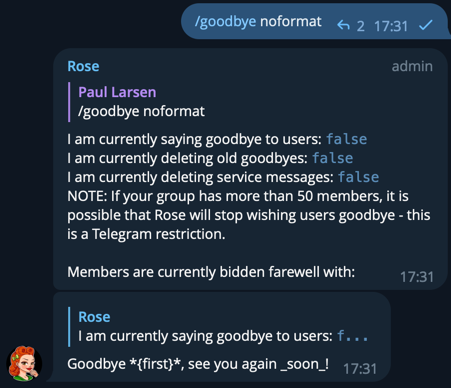
View Goodbye (Unformatted)
With this option, you can view the raw goodbye message. What this means is that any buttons or markdown present in your goodbye message, it will display the code for these. For example, if you had the word "Bye!" written with italics in your goodbye message, then instead of showing you italic text, the viewed message would show Bye! instead. You can view this raw output by issuing the /goodbye command with the noformat argument, like shown below:
/goodbye noformat
The result will be a message like the below. This type of output helps make things easier if you need to edit your goodbye: